


Continuation – Steps in Building an Ideal Custom Wine Cellar in CA
Contents
This is a continuation of the article on the steps in constructing a residential custom wine cellar in Los Angeles California. The article summarizes wine cellar construction in 10 basic steps. If you haven’t read steps 1 to 5, click here!
The following are steps 6 to 10 of building a custom wine cellar in California:
6. Cover the Wine Cellar Walls and Ceiling
Once you are done installing the studs, the vapor barrier, insulation, and all necessary electrical outlets, the next thing to do is to cover the room’s walls and ceiling.
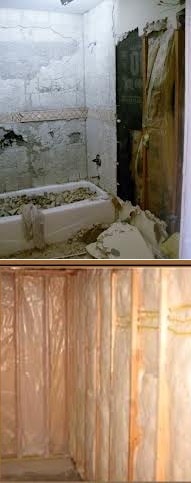
Preparing the Wine Cellar Wall & Ceiling
The material used for covering the walls and ceiling should be highly resistant to humid conditions. The most common material used in residential custom wine cellars in Los Angeles, CA is water resistant drywall, also known as green board. Green board is the same material that is used in bathrooms and kitchens. You can find it at your local hardware store.
Make sure to screw the green board into the walls and ceiling of your custom wine cellar, so that it remains steady and durable. Apply a fire rated penetration sealant all around the penetrations on both sides of the home wine cellar.
The next step is to finish the drywall. It is imperative that the drywall is run all the way to the floor, without any gaps, because the base molding will be attached to the front of the wine racks. No molding should be installed on the cellar wall, so that back of the racking remains flush with the cellar wall.
Once the drywall is finished, have it painted. Make sure that a good primer is applied, and then use a water-based exterior grade paint. Water-based paints are always the best choice for refrigerated wine cellars, because oil-based or solvent-based paints leave a bad odor in the wine storage room, which may affect the flavor and aroma of your wines.
When painting your drywall, make sure that the paint goes all the way to the floor. Some painters stop at an inch or two above the floor, because they know that this area will be covered with base molding. The base molding will be installed on the front of the custom wine racks, so if an inch or two of the wall before the floor is left unpainted, an unsightly gap will appear.
There are other materials that can be used to cover the wine storage room’s walls and ceiling as well. A good decorative option is to apply tongue and groove material that matches the wood, the stain, and the finish of your custom wine racks.
In order to attach the tongue and groove, make sure that you screw a ¾” marine grade plywood on the wine cellar’s walls and ceiling first. Another alternative for wine cellar walls and ceiling covering is to install a raised panel ceiling and/or soffit in addition to the tongue and groove paneling. Although this option does not add much value to the wine cellar insulation, it will increase the aesthetic appeal of your wine storage room. Raise panel ceiling can be customized to fit any ceiling’s shape.
7. Install Wine Cellar Flooring
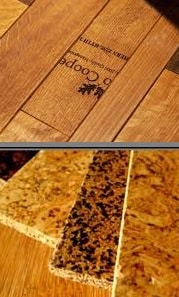
Wine Cellar Flooring Materials
The most important thing to remember when installing wine cellar flooring is to choose a material that is highly resistant to the humid environment inside a wine storage room. Carpet should never be used as a flooring material. Not only will it fail to withstand the humid conditions, it will also rot easily. Some wine cellar experts allow the use of vinyl for wine cellar flooring, but as much as possible, avoid it. The mastic under vinyl flooring will remain moist, and the flooring will tend to move and buckle. Bare concrete flooring is fine, as long as the concrete is sealed properly. The better options for wine cellar flooring include porcelain, tiles, cork, hardwood, and reclaimed wine barrels. These materials are not only durable, but also aesthetically pleasing.
When you have your flooring installed, make sure that a ½ inch gap is allowed all around the perimeter of the floor. This gap is necessary to allow room for expansion. If possible, allow wooden flooring to acclimate to the humid conditions of the wine cellar for 48 hours. This will minimize the amount of expansion that will occur.
8. Installing the Custom Wine Cellar Door

Coastal designs wine cellar doors in California
The custom wine cellar door should be an exterior grade door, sealed on three sides with weather-stripping. The bottom of the door should have a threshold and a door sweep.
Interior grade doors are not recommended for refrigerated wine cellars, because they will affect the temperature and humidity inside. A refrigerated wine cellar’s temperature should be maintained within 55 to 58 degrees Fahrenheit, and the humidity within 55% to 75%. Only an exterior grade door can provide an effective barrier between the wine cellar room and the outside.
Some wine cellar experts opt to install a glass wine cellar door. If so, make sure that it is thermopaned, for optimum insulation properties, and to make sure that it does not condensate. Solid wood wine cellar doors are another good option.
9. Installing Effective Custom Wine Cellar Lighting
There are various options for custom wine cellar lighting in Los Angeles, California. It is important to remember that, when using any lighting in your wine cellar, you need to use thermally fused can lights or IC rated cans. Avoid using lights that emit Ultraviolet light, because these can damage your wines. UV light produces too much heat, which can cause the premature aging of your wines.
10. Add Final Decors and Wine Cellar Accents
You want to make sure that your custom wine cellar is not only effective in keeping your wines safe and aging well, but also beautifully designed and decorated, so that you can show it off to your guests. Once you have completed all the basics of constructing the wine storage room, you may then add all the other decors and accents that will complete the aesthetic look you want to achieve for your wine cellar.